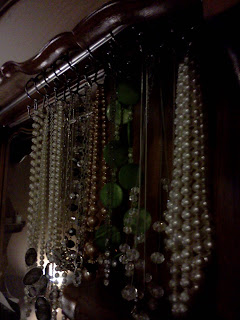
So I have this tiny little jewelry box and all these amazing necklaces. They definitely don't work well together. I have been brainstorming on how to make it work and thought about this!
It's just a tension spring rod "installed" in the top of our dresser. I used some shower S hooks to hang the necklaces on! Brilliant, I know! Now I can look at my beautiful jewelry every day and it's much easier to see what I have!
February 22, 2013
Transferable Ruler Growth Chart
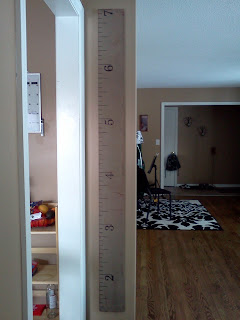
I'm so excited to show you my newest project! A Ruler Growth Chart -
Our boys are growing so fast that I really wanted to get their heights recorded! Since we own our home now, you'd think that we'd just draw on the door frame, but I had some concerns about this. What happens if we move? What happens if I need to repaint? How am I going to clean it without wiping all the marks off?
So I heard of an idea. One of my friends had just a board that they drew on. That way they could take it with them whenever they moved! Of course I couldn't just have a board...so Pinterest it was. :) All good ideas come from Pinterest! While I was there I found this ruler from 517 Creations. I loved the aged look and we did have an extra random piece of plywood in our basement from the previous owner! Bonus! Another FREE project!! :)
So here's how I did it...
I started with this random piece of plywood in our basement. It's 6' tall and about 4" or 5" wide.
Now it was basically the color of plywood and that wouldn't do for something that was going to go in my house so I had to stain it. The only stain I have is the one that matches our floor, and I didn't want it to exactly match, so I again got an Pinterest to see about how to make wood stain. I came across this post from Kara Paslay Designs on how to make your own wood stain from Vinegar and Steel wool. Here's how mine turned out -
So, after a few days of waiting for the stain to get ready I went to work on my wood. I only put about one GOOD heavy coat on my wood. Here you can tell the difference between the stain and the non stained wood.
And here's the finished product:
I'm really impressed with how it turned out. After it dried it became more of a uniform color and I really wanted it to look aged or antique so I had to get a little more creative. I pulled out my ink from my scrapbooking stuff (brown and black) and decided to "age" the wood a bit. I rubbed the ink all around the edges and kinda splotched it all over the front of the wood as well. Now it looks like this!
Then I took out my measuring tape, a pencil, a ball point pen and a sharpie. I measured off every inch. I started at 1 foot so that I could end at 7 ft. I know that's kinda tall, but this is going to be something I want to use when my boys are into their teens and I didn't want to risk not having enough space. Besides, they were both born longer than a foot, so I can even start from birth! :) I made each foot marker 3 inches long, the quarter markers 2 inches long and the eighth markers 1 inch long. Here's a better photo:
To make the numbers I followed the advice from 517 Creations and printed out the numbers 2 through 7 in 200 pt font. I used Century font because it looked good and that's what she used. Then I rubbed pencil on the back of the paper covering each number. I then turned it around and traced the outside of the numbers in ball point pen onto the wood, therefore transferring a pencil outline onto the wood. Then I took my black sharpie and drew the numbers and colored them in. I think it looks pretty good!
Then I'm sitting here with a completed ruler and no way to get it on the wall. I figured that if I drilled a hole in the back of it I could hang it with a nail. So that's what I did. I used a medium sized drill bit, drilled a hole about halfway into the wood and the made sure the nail would fit in the hole. To put it on the wall I measured up to 2 feet on the wall and matched that measurement with my ruler. I measured where my drilled hole was from the top of my ruler and nailed it in the wall at that measurement. It took about 3 tries to get it right, but it was worth it.
After it was on the wall however I was a little worried that 1 little nail wouldn't be very stable with the boys always up against it and all. So I remembered that we had some Command picture hanging strips left over from something! They are designed to hold up to 9 lbs, so surely it would hold this! I took a couple of those, put one in the middle of the ruler and at the bottom to keep it from swinging and attached it to the wall with them also. It is still hanging by the nail, but the strips are "keeping it in place."
We've already tried it out! The boys love it and I'm excited that if I need to, I can take it with me and it will be something I will always treasure as my boys grow bigger and bigger!
The best part? When my husband came home, he saw it and said, "Wow! Where'd you get that?!" Ha, he didn't even know I made it. Said it looked like it came from Pottery Barn or something!! AWESOME!! :)
Labels:
DIY,
Kids,
Pottery Barn,
Ruler
February 21, 2013
Snow Ice Cream!!
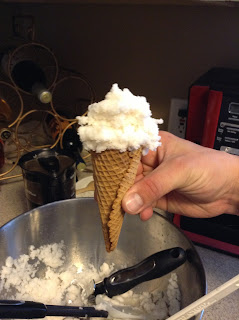
What a treat! We got around 12 inches of snow today and after playing a while, P suggested we make snow ice cream! I've never had it before so of course we did. The boys had so much fun making it and eating it too. It really tasted great! I was very surprised at the result!
Here's the recipe we used:
7-8 cups CLEAN snow ( nothing yellow)
5-6 Tbs sugar (we actually used 2-3 Tbs of Truvia blend)
2 tsp vanilla
1/4 cup milk
1/4 cup half and half
We also made an adult flavor by substituting brewed cold coffee instead of vanilla! BIG HIT! My sister said the coffee flavor tasted like Edie's slow churned from the store!!!! I'm okay with that. :)
Here's the recipe we used:
7-8 cups CLEAN snow ( nothing yellow)
5-6 Tbs sugar (we actually used 2-3 Tbs of Truvia blend)
2 tsp vanilla
1/4 cup milk
1/4 cup half and half
Mix together and serve immediately.
We also made an adult flavor by substituting brewed cold coffee instead of vanilla! BIG HIT! My sister said the coffee flavor tasted like Edie's slow churned from the store!!!! I'm okay with that. :)
February 16, 2013
Super Playroom
After our trip to Disney and Universal, the boys can not stop talking about who we met, what we did..."remember when," it's fantastic! So, to cultivate and create more memories, I decided to give their playroom a makeover. This project litterally didn't cost me anything! I already had the paint from the boys' bedrooms, so I just used that! I'm so excited about it, and my husband is excited about the price!
Here is the before:
Messy toys and all...
And here's the After:
I was so excited about this wall that I took the pic as it was drying...hints the wet paint look. Pretty super don't you think?!
This is a vinyl that I got as a Christmas Present. I LOVE it and works VERY well for the playroom area.
I know, a little organization goes a long way. :)
This used to be G's dresser as a baby. I took the drawers out, added a dowel rod, moved the shelf and painted it. Now it stores all their dress up clothes. More hats and accessories are in the shelves behind the door.
The bulb cover broke as we were putting this in. This was a garage sale find and is awesome!
Here's some of the "behind the scene's" photos of the process:
It literally took me 3 days to finish this shield. It was totally worth it though. I had to draw it by hand first because there is no template for a wall sized Captain America shield. :) I couldn't use tape because they don't make curved tape either...the nerve. I kinda liked the brown with these colors, but it didn't match the theme.
Now this I could use tape for, but I had to cut the tape exactly to the angles and all. It took about 2 days to complete this.
Putting on the vinyl
I think the room looks fantastic! The boys LOVE it!! M keeps wanting to take everyone up there to see the BIG Captain America's Shield!! It must look enormous from his perspective. :) What do you think? I'd love to hear your comments!
Labels:
Boy,
Captain America,
DIY,
Home,
Playroom,
Redo,
Room,
Super Hero
February 14, 2013
Valentine's Deck of Love
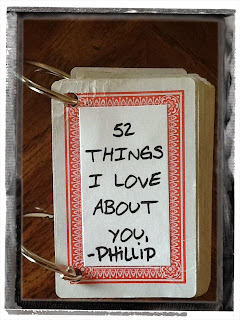
This year for Valentine's Day I wanted to do something special and cute. I also wanted to keep costs down, and since a week long vacation to St. Andrews for a golf trip was out of the question, I came up with this idea. I stole it from this blog and it went over very well! He loved it and has been sitting by his nightstand ever since. This was a BIG hit!
I just measured the cards, created a document in Word and printed it out. Then I cut out all the reasons and modge podged the reasons to the deck of cards. This was an extra deck that we had laying around the house (we have 5 or so) so it was perfect. Then I punched the holes in the cards and put the deck on the rings. Voila! Instant V'Day gift.
The font I used was my own handwriting! I found this awesome website that will create your handwriting into a font that you can install on your computer! The website is: myscriptfont.com. You can download a template and scan in your handwriting. Very cool and FREE!!
Subscribe to:
Comments (Atom)


