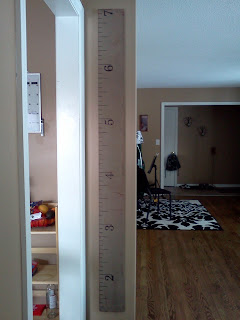
Our boys are growing so fast that I really wanted to get their heights recorded! Since we own our home now, you'd think that we'd just draw on the door frame, but I had some concerns about this. What happens if we move? What happens if I need to repaint? How am I going to clean it without wiping all the marks off?
So I heard of an idea. One of my friends had just a board that they drew on. That way they could take it with them whenever they moved! Of course I couldn't just have a board...so Pinterest it was. :) All good ideas come from Pinterest! While I was there I found this ruler from 517 Creations. I loved the aged look and we did have an extra random piece of plywood in our basement from the previous owner! Bonus! Another FREE project!! :)
So here's how I did it...
I started with this random piece of plywood in our basement. It's 6' tall and about 4" or 5" wide.
Now it was basically the color of plywood and that wouldn't do for something that was going to go in my house so I had to stain it. The only stain I have is the one that matches our floor, and I didn't want it to exactly match, so I again got an Pinterest to see about how to make wood stain. I came across this post from Kara Paslay Designs on how to make your own wood stain from Vinegar and Steel wool. Here's how mine turned out -
So, after a few days of waiting for the stain to get ready I went to work on my wood. I only put about one GOOD heavy coat on my wood. Here you can tell the difference between the stain and the non stained wood.
And here's the finished product:
I'm really impressed with how it turned out. After it dried it became more of a uniform color and I really wanted it to look aged or antique so I had to get a little more creative. I pulled out my ink from my scrapbooking stuff (brown and black) and decided to "age" the wood a bit. I rubbed the ink all around the edges and kinda splotched it all over the front of the wood as well. Now it looks like this!
Then I took out my measuring tape, a pencil, a ball point pen and a sharpie. I measured off every inch. I started at 1 foot so that I could end at 7 ft. I know that's kinda tall, but this is going to be something I want to use when my boys are into their teens and I didn't want to risk not having enough space. Besides, they were both born longer than a foot, so I can even start from birth! :) I made each foot marker 3 inches long, the quarter markers 2 inches long and the eighth markers 1 inch long. Here's a better photo:
To make the numbers I followed the advice from 517 Creations and printed out the numbers 2 through 7 in 200 pt font. I used Century font because it looked good and that's what she used. Then I rubbed pencil on the back of the paper covering each number. I then turned it around and traced the outside of the numbers in ball point pen onto the wood, therefore transferring a pencil outline onto the wood. Then I took my black sharpie and drew the numbers and colored them in. I think it looks pretty good!
Then I'm sitting here with a completed ruler and no way to get it on the wall. I figured that if I drilled a hole in the back of it I could hang it with a nail. So that's what I did. I used a medium sized drill bit, drilled a hole about halfway into the wood and the made sure the nail would fit in the hole. To put it on the wall I measured up to 2 feet on the wall and matched that measurement with my ruler. I measured where my drilled hole was from the top of my ruler and nailed it in the wall at that measurement. It took about 3 tries to get it right, but it was worth it.
After it was on the wall however I was a little worried that 1 little nail wouldn't be very stable with the boys always up against it and all. So I remembered that we had some Command picture hanging strips left over from something! They are designed to hold up to 9 lbs, so surely it would hold this! I took a couple of those, put one in the middle of the ruler and at the bottom to keep it from swinging and attached it to the wall with them also. It is still hanging by the nail, but the strips are "keeping it in place."
We've already tried it out! The boys love it and I'm excited that if I need to, I can take it with me and it will be something I will always treasure as my boys grow bigger and bigger!
The best part? When my husband came home, he saw it and said, "Wow! Where'd you get that?!" Ha, he didn't even know I made it. Said it looked like it came from Pottery Barn or something!! AWESOME!! :)


No comments:
Post a Comment