
I am SUPER excited to FINALLY reveal my Formal Living and Dining Room project!! Ever since we bought this house 2 years ago I have been dreaming and drooling over this day! I knew instantly that this is what I wanted to do with the room and had to wait and save until I could finally do it. I do have to say, now that the vision is complete I couldn't be more thrilled with how it turned out. It is exactly what I had in my head and I can't wait for you to see all of it!!!
WARNING...I am a detail oriented person...if you are wanting to know step-by-step how to do this yourself, you are in luck! If you just want to look at the pretty pictures, skip the words. :)
First things first...when we bought the house, this is what we moved into:


And here...drum roll please...is the AFTER!!


So here's the process...again, if you just want to see the pictures just keep on scrolling. :)
First comes the math...remember I've been wanting this for 2 years, so I've had some time to figure this out...but the math is the most important part. Now, don't get me wrong, I'm not a fan of math at all...I'm a musician...all I have to know is how to count to 12, however, if you don't take the time to plan it out you will have funny looking walls and lots of random cutouts where your outlets go.
I measured the length of each wall and what I wanted my finished product to look like. I chose 3 inch vertical battens, 4 inch top battens and a 1 inch strip across the bottom (explained in a bit). Plus I added a 1/2" x 1.5" "ledge" board on top and some cove moulding to finish it off.


NOTE: In order to figure out the placement of the boards use this formula -
1) figure out how many vertical boards you want on the wall
2) multiply that times the size of the board (3 inches)
3) subtract that number from the total width of your wall in inches
**This gives you how much wall space is left!
EXAMPLE:
6 boards = 18 inches
73 inches (wall width) - 18 inches = 55 inches (left over wall space)
4) then take this number and divide by the number of spaces between your boards (this number will always be 1 less than the number of boards)
**This gives you how many inches will be between your boards!
EXAMPLE:
55 inches/5 spaces = 11 inches between boards
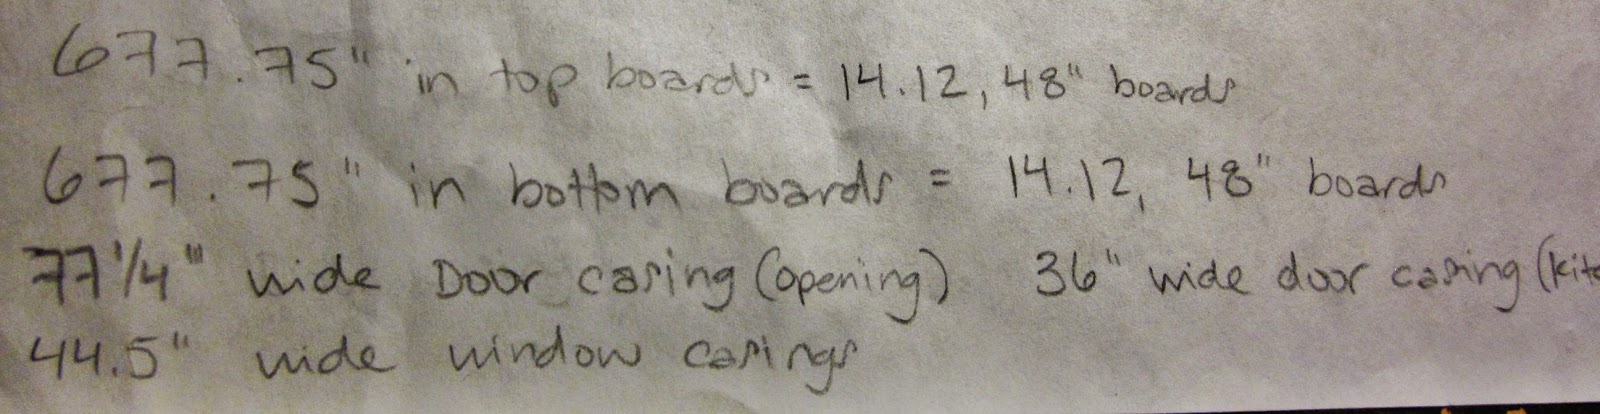
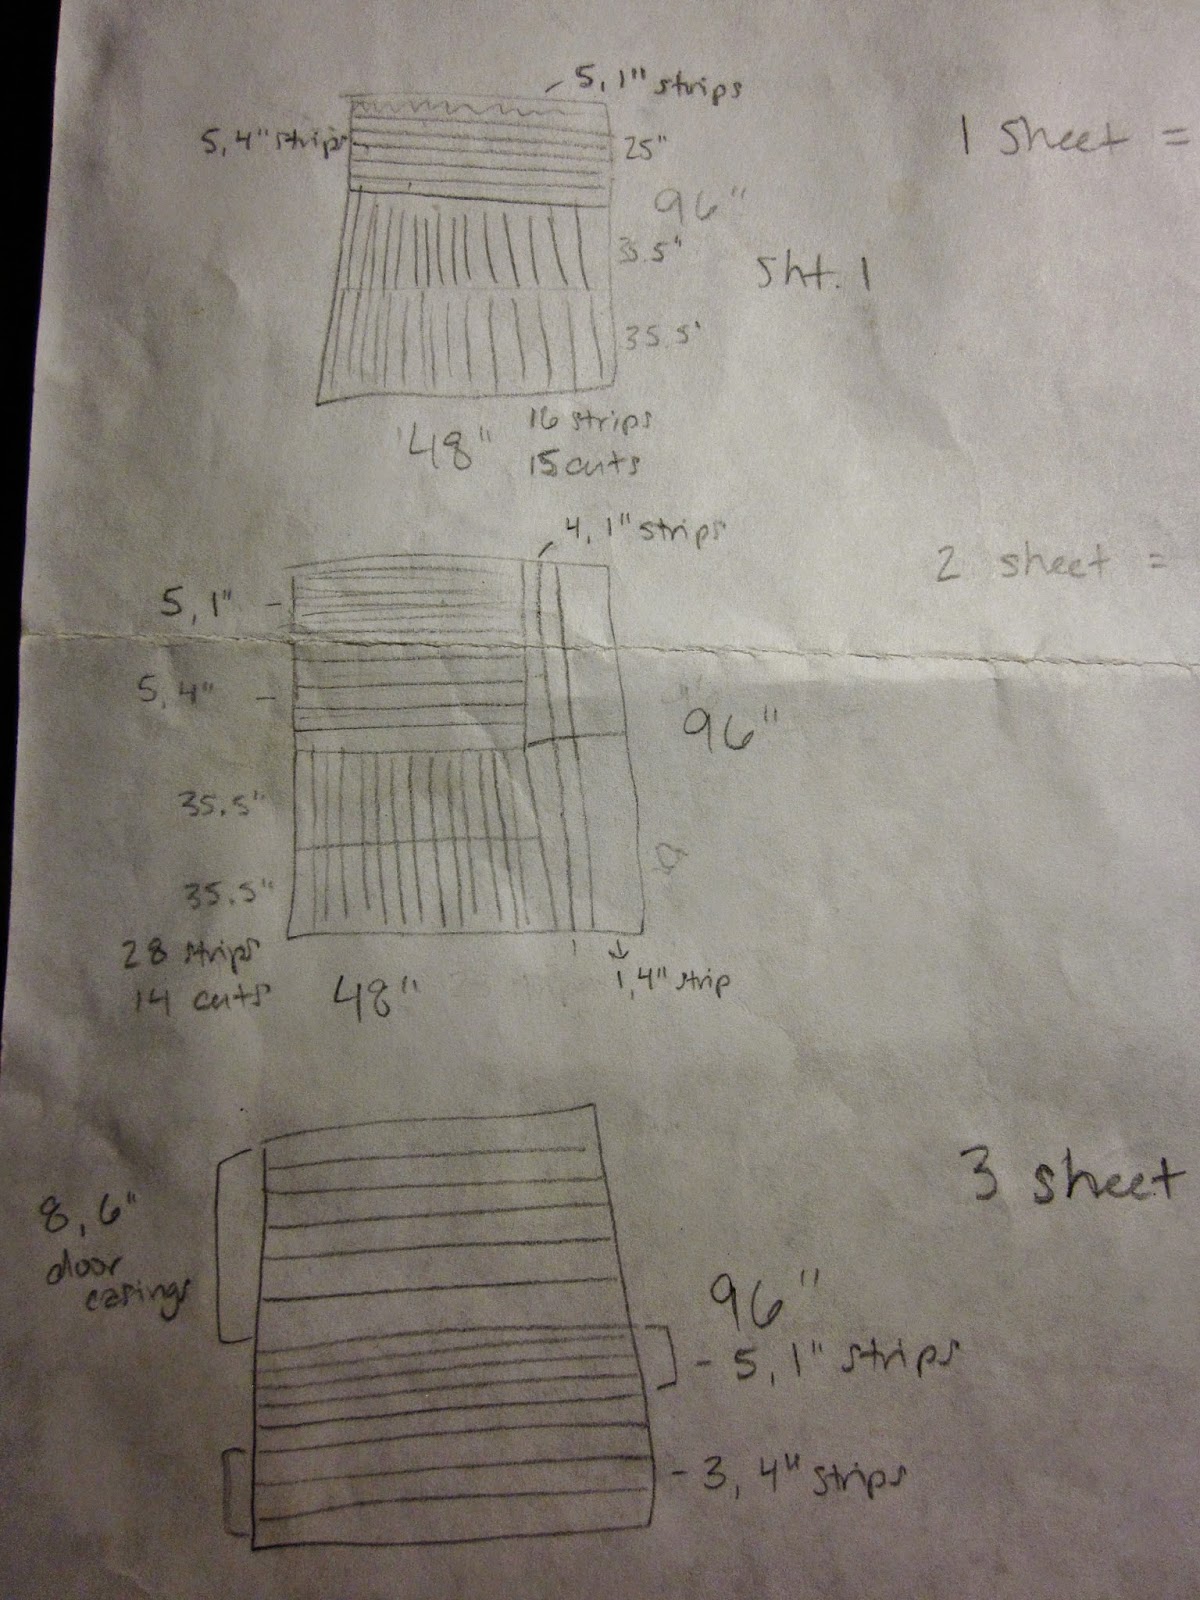
I even went as far as to figure out how many boards of which size I needed and how they would fit onto a sheet of MDF...all about the budget. I wanted to know exactly how much this was going to cost. After all, I've been saving little by little for 2 years.
I know, I'm a little crazy. But I wanted to know exactly how it was going to work out. Anyway, after you have your main plan, head to the store. I went to Lowes because it's close and that's where my gift cards were from (oh yes, I asked for gift cards in lieu of birthday presents). To complete this project I needed the following supplies:
3 sheets of MDF
1/2" x 1.5" pre-primed MDF boards (8 foot pieces)
cove moulding (8 foot pieces)
bead moulding (8 foot pieces) for the door/window casings
small wooden moulding pieces that are flat on the back and curved on the top and bottom (8 foot pieces) for the door/window casings
Liquid Nails
Alex Plus Paintable Caulk
Dry Dex Spackle
Wall Primer
Paint in Satin finish for the top half of the room
Paint in Semi-Gloss finish for the wainscoting and casings
The guy at Lowes would not cut all the strips of MDF for me for free, but he would make rougher cuts so I could load it all into my car. Again, a perfect use for my plan. I just had him cut the sections already planned out and then borrowed this bad boy from a friend to finish the job!!


Now that everything was cut and ready to go I needed to get started painting! First step is to paint the primer on the bottom half of the wall. Don't worry about making it a perfect coat, just 1 coat of primer is all you need to prep your surface. Trust me, this makes all the difference when you go to paint your installed wood. I just painted up to the measurement that I wanted my wainscoting because the wall paint that I picked for my top half was the kind with the primer already in it!


Also, just in case you were wondering, don't ever use year-old paint and expect it to match the brand new paint that you just bought. I figured, it's the same shade right? It will be fine! I painted the entire dining room and cut in the entire living room with the year-old paint then painted the rest of the living room with the new paint. My old paint had turned green. I had to paint the entire 2 rooms AGAIN! 2 coats!! I was so frustrated...but hey, if that's the worst of my problems with a project this size I'm good! So, just a word to the wise...throw out the old paint. Just buy the new...you'll be glad you did.
Any-who...next paint the top portion of your wall with your color of choice. I used Olympic Paint and Primer in ONE from Lowes. The color is called Secret Passage. I LOVE it! It's the perfect shade of grey...not too blue, not too brown, not too green. Just beautifully grey!


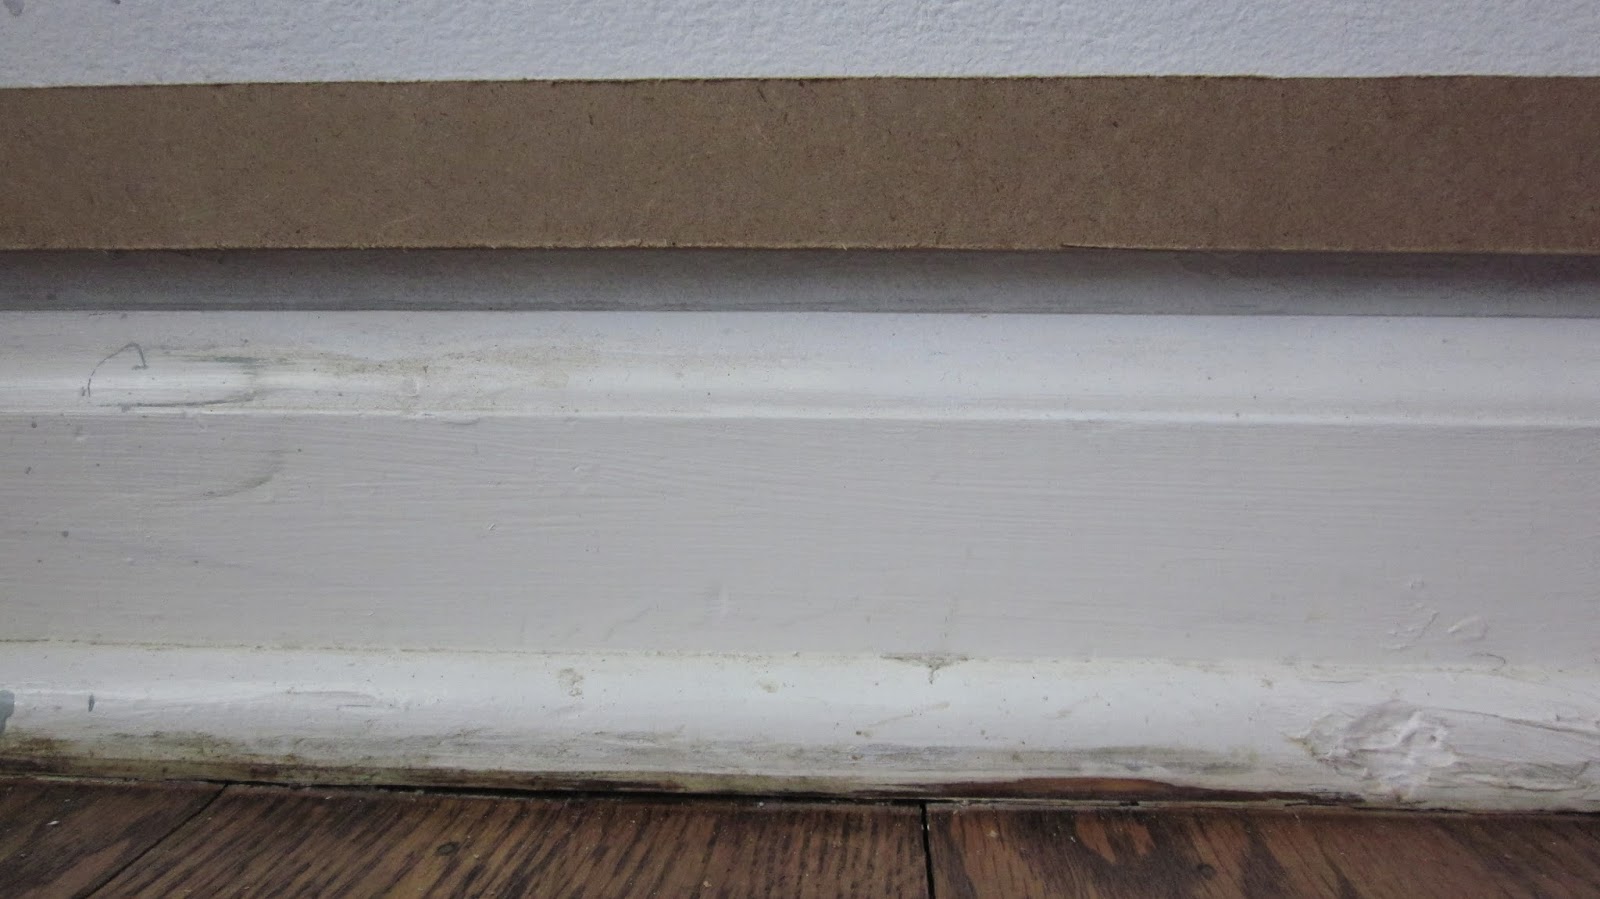
There's a good "before" pic of the door/window casings!

Now for the fun part! Everything is ready to install! I also borrowed a pneumatic finish nailer and air compressor for this project as I didn't want to spend energy or sanity on drilling in around 1000 nails by hand. I might be crazy, but no thank you.
Remember those 1 inch boards I mentioned on the bottom? Well I wasn't in the mood to remove my baseboards either, and I had read several blogs on how to keep my existing baseboards by butting the vertical battens up next to it and mitering the edge. I personally didn't like the way that looked. I just felt it needed to be a little more finished, but again, didn't feel like removing all the baseboards in my large room. So, I figured that if I installed a 1 inch board about 1/2 inch above my baseboard I'd still get the look that I wanted and also get to keep my existing baseboards! So if you want to go this route...install the bottom boards FIRST!!


After all your vertical boards are in place, go ahead and install your top 4 inch boards. Then you can place your "ledge" on top of these boards to where it sticks out into the room 1.5 inches (short edge to the wall). Then nail your cove moulding underneath the "ledge" to cover the seam of the two boards.


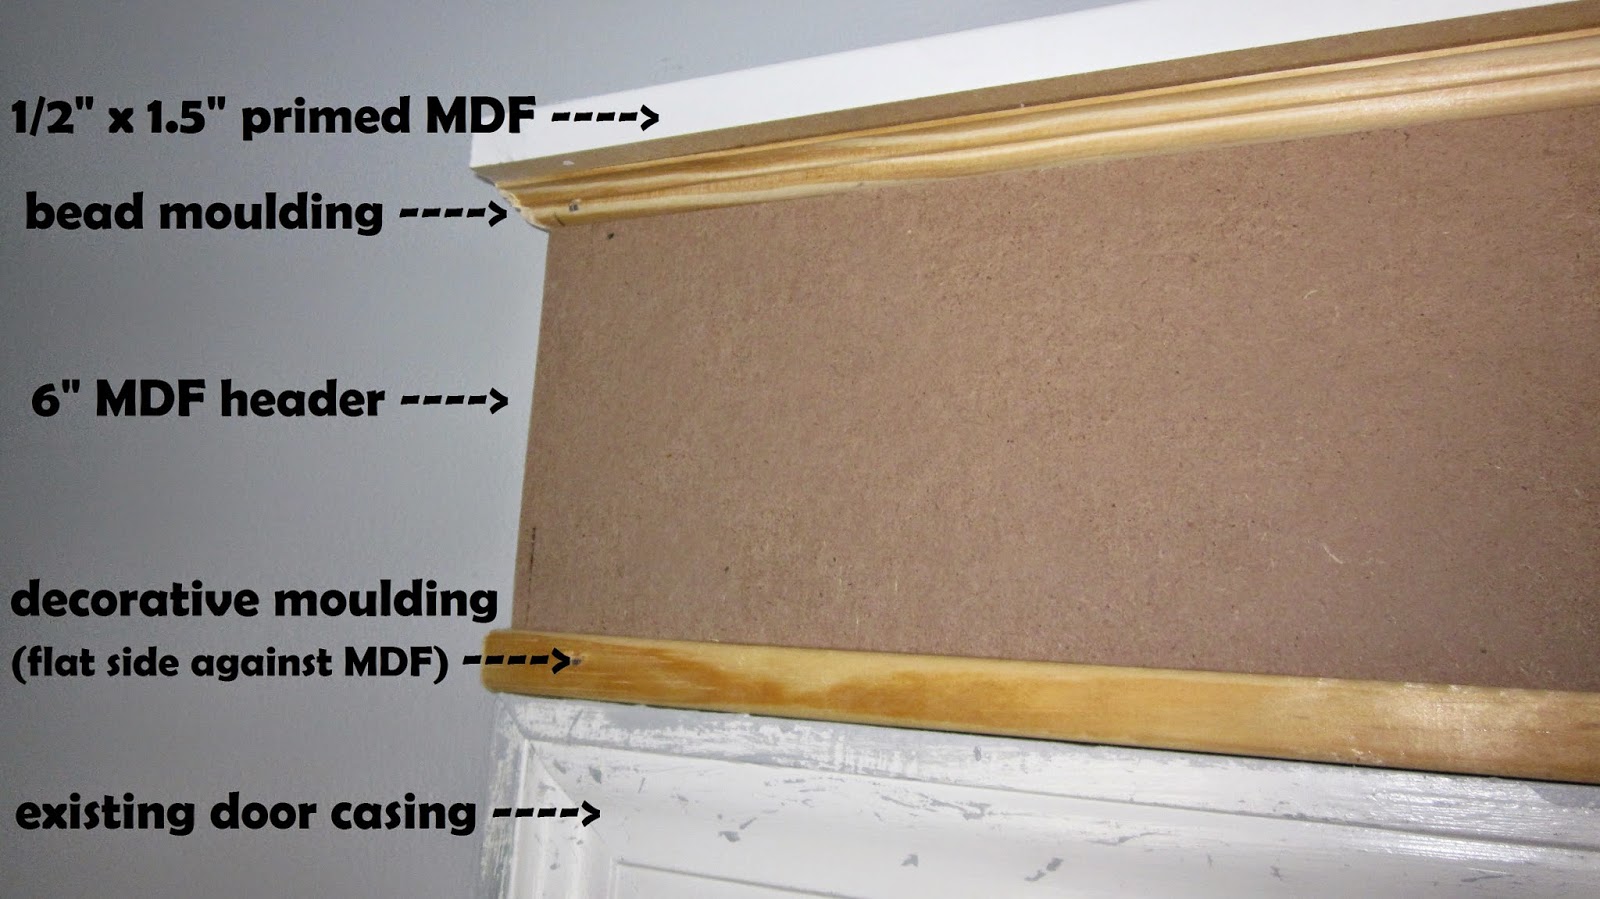
For the Door/Window casings again, I didn't want to get rid of my existing casings so I just installed the headers on top of my current casings! Here's a close up of the pieces:


Now that all the woodwork is installed you get to really get down and dirty! Here's where the really important work begins. Spackling, Sanding and Caulking. This took a couple of days for sure! The spackle is for the nail holes and the seams of all the pieces. Here are some pictures of the installed spackle.


This part can get REALLY tedious, but take your time, make sure it is all done right. It really does make a HUGE difference in your finished product.


Next is caulking. I know you are thinking..."but I just filled in all the spaces!" That may be true, but in the space between the ledge and the wall it's better to caulk. The spaces between the existing window casings and the MDF, caulk. and ESPECIALLY all the spaces where the MDF meets the wall...CAULK! You won't think you will need to because it's flush, but again, it really does make a difference. It will create that seamless look like you just cut holes into your wall. Here are some before caulk pictures to prove it to you.


Okay! Ready to see some fruit from your labor?! Now it's time to start the painting process!! YAY!! The MDF will soak up the paint like a newborn baby drinking milk, so make sure you prime the wood first! Get all those little crevices and edges. Really lay it on thick. The thinker your primer, the less top paint you will have to use. Here is what it looks like with the primer on.


And, with no further adieu...here's the official finished product!!!!! :)


Here is the Dining Room in detail around the room...


On the ends of this little "partition" I
put two 1 inch strips on the sides to make it look the same as the rest
of the room. It works for me.


And again...the crazy curtains. When I put the original blue ones back up, they clashed with the tone of grey that I love...so I'm on the quest for new curtains now too. I'm a little frustrated, but it will all work out in the end. Stay tuned for the redecorating reveal coming soon.


Well, there you have it! My fabulous new tailored Board and Batten Wainscoted Formal Living and Dining Room! I hope you enjoyed your tour and I hope you are inspired to create your own beautiful room.
Stay tuned for the Redecorating Reveal that has to happen...I need to find something to put on these fabulous walls...and new curtains...and paint the pew...oh and the Entry Way...
Oh my! If you give a Mom a Remodel! :) Until the next time! Happy Decorating!
Oh, just one more time:
BEFORE

and...
AFTER

Looks great Kristi!!
ReplyDelete