Showing posts with label Paper. Show all posts

October 3, 2012

Fun Halloween Decor

Happy October!!  It's time to get out the fun Halloween Decor and make your house festive for the holiday.  My front porch is already decorated with my Pumpkin Topiaries and a few fun pumpkins I got from our local craft store, but I needed something that said "October."  Our family does celebrate Halloween, but not the "scary" Halloween.  For us, it's about dressing up in a FUN costume and getting to eat lots of candy and having fun with friends.  We do not promote the scary, mystical or demonic side of Halloween. 

So you can see my delima when decorating my new house.  I wanted something that went along with the holiday, but not anything scary or witch-like.  I came up with a few things and I wanted to share them with you in case you wanted an alternative to the "commercial" Halloween Decor.

Here are a couple of items I thought up:

Boo Door Decor

 
Milk Jug Goblins
 
Let's start with the Boo Door Decor first!
The thing I REALLY like about this is that most of the supplies came from the dollar store! This was a VERY inexpensive decoration to make!  I always start there when I want to decorate my home, because it's the cheapest!!
 
Supplies:
2 Craft Floral Rings
 Wooden Letter B (you can make this from cardboard if you want)
Crate Paper in Black, White and Orange
Modge Podge
Stapler/Staple Gun
Hot Glue Gun
3 Buttons
Ribbon
Scissors
 
 
How to:
First, Cut a long strip of Crate Paper.  Then place a little bit of Modge Podge on the back of your letter.  Place one end of the crate paper onto the modge podge.
 
 
Wrap the paper around the letter.  Don't worry about making it pretty.  The texture is what you are going for, and the beauty about Halloween decorations is that the messier they are, the more festive they look.  It's all about the character. :)
 

When you come to the end of your paper strip, and then end of your wrapping, just make sure it finishes on the back side of your letter.  Take some Modge Podge, dab a little on the back of the letter where your strip will land and gently press to seal.  You can also apply a layer of glue on top of the paper as well.  Continue to cut long strips and wrap the letter until it is all covered with paper.  I decided to alternate the colors of my letters.  Black, white, black. 
Here's what they look like all "wrapped."
 
 
Notice the messy "B." :) "B"eautiful! Now take some orange crate paper and fold, crumple or twist to make any kind of "flower" you want.  Staple it onto the letter where you want your "accent".
 
 
Again, don't worry about being pretty, you're going to pretty much cover it up anyway.  Now, hot glue your button to the center of your "flower" to cover up the staple.


Try to mix the colors, white button on the black letter, black button on the white letter.  If you have a spider, or a pumpkin or any other cute "trinkets" you could use those instead of buttons.
 
Now to attach your letters together to form your word! Take your ribbon and staple it to the back of the letters.  Start with the top "B" first. 


Then decide where you want your "O"s to go in relation to your "B" and staple the ribbon accordingly on the back of all letters. Now lay it out and look at what you've made!
 
 
To hang it on the door, I did need to make a bow to tie in the loop and onto my wreath hanger on my door.  It wasn't hard, just a simple bow.  What do you think?  Please leave your comments below!


I think it looks great on my porch with my pumpkins!
 
 
NOTE: Only attempt this if you have a screen door that will protect the paper from the elements.  Otherwise, you may end up with a very sloppy mess.  Messy is festive, but sloppy is just tragic. I guess you could go ahead and put a layer of Modge Podge over your entire letter to seal it from the elements, but you may loose some of your texture of the paper.  I don't know, I didn't try.
 
Next let's take a look at how to make the Milk Jug Goblins -
I do have to confess, this is not an original idea.  I saw it first on Pinterest.  To see the inspirational post from another blog, click here.
 
Supplies:
Empty clean dry milk jug (different shapes look best)
Black Magic Marker
Scissors
Flameless LED Candle
 
How To:
Take your marker and draw a cute or fun face on one side of your jug.  I didn't even worry about taking the label off, because no one is going to see the back of your jug.  Then cut a hole in the back of your jug so that you can access the candle.  If you don't want to put a light source in your jug, don't worry about this step.  Then turn on the candle and place it on your porch or table.  If you don't have a flameless candle, then you can use Christmas lights or glow sticks to light your jug.  Just make sure your hole is big enough in the back to put a strand of mini lights inside.  You can use the icicle lights and a LOT of jug goblins to create a fun atmosphere if you like.
 
 
I cut off the tops of my jugs too, just for a more fluid look.  I plan to add several more to my porch as we use up the milk during the month.  I think they are cute and add to my decor as well. :)


September 12, 2012

Fall Banner How To

You may have seen my new Fall Mantle and thought to yourself, I want to make that same banner!  Well, you can!  This is a little tutorial on how to make that cute banner. Here's what the finished product looks like:
 
 
Now on how to make one yourself!  Bear with me, there are a lot of photos, but I'm a visual person, so I hope it helps.
 
Supplies:
Fall type scrapbook paper or card stock
Clear Contact Paper
Ribbon
Scissors
Computer & Printer
Masking Tape
Ruler
Pencil
 
 
How To:
I found some 5.5" x 8.5" really cute handmade paper in my scrap booking stuff that was PERFECT for this!  However, you can use any paper, card stock or even construction paper for this project.  The "laminating" step will strengthen the paper, so it will be strong no matter how thin it is.
 
If you do use a larger paper, decide how big you want your letters.  I think the size mine is is perfect for the size of my mantle, but that is a decision you will have to make.  All my measurements are based off my 5.5" x 8.5" paper, just so you know.
 
Go into Microsoft Word or any other program you like really and create a word art of each letter.  Choose a font you like, shape and color.  I used Algerian Font size 470.  Make sure you change your Page Layout to the size of paper that you have chosen.  Center your letter and make 4 different pages (one letter per page).  You could customize it with different fonts for each letter, or different colors of ink on your papers.  I chose black because my paper is very ornate.
 
Print each letter onto your papers.  You should then have 4 pages that look like this:
 
 
Next step is to draw where you want to cut your design...if you want one.  Even though the paper was interesting, I wanted a little pizazz to my banner.
 
I found the middle of my paper (2.75") and made a mark. 
 
 
Then I decided that I wanted my design to come about 1" high, so I made another mark 1" up on the page in the middle.  Then I placed my ruler at the top mark, and then the corner of my page and drew a line with my pencil.


Now comes the "laminating" step.  If you have a laminator at home, have at it.  I do not, so I went the easy route and used clear contact paper to "laminate" my letters.  The purpose of this is just to make it a little sturdier and to hold it together better so that I can use this again next year!
 
Take your contact paper and fold it on itself BEFORE you cut what you will need.  Then lay the letter on top to measure how much paper you will need.
 
 
There, now you can cut off the contact paper.  Remember to do this 4 times (one for each letter).  You can see I used about 12 inches of contact paper.  I wanted to make sure it would be enough.  After you have cut your paper, peel the edge off and gently place your letter onto one side of the paper.  Then carefully fold the paper onto itself to "laminate" your letter.
 
You will need to smooth out the contact paper over your letter.  Be careful!! This is VERY sticky and can cause wrinkles.  Unfortunately, if it is not smoothed well, you will either have wrinkles or have to do it all over again. I messed up once and it tore my paper when I tried to remove and re-smooth...hence the no picture for this step. :)
 
Next, cut out your letter.  You can cut all the way to the paper edge, this will not separate!! Make sure to cut out your pencil design as well!
 
 
Here we are so far!  Getting closer! Now it's strong AND waterproof! :)
 
 
Next, you need to cut a slit for your ribbon.  I used my exact-o-knife, but scissors will work just as well.  Again, I'm a perfectionist, so I measure everything.  This measurement (because you are dying to know) was slit a total of 1.5" from the exact middle of the page.
 
 
Now, push your ribbon into the front side of your letter and tape it on the back. I chose ribbon cut to 12".  Again, look at your mantle or place you are hanging this and decide how long your ribbon will need to hang.  Then add 2" to your measurement to secure the paper to the ribbon and the ribbon to your mantle or shelf.


Voila! There you have it.  Do this to all 4 letters, then take your tape at the other end of the ribbon and tape it to your shelf or mantle! What do you think?! :)


To see pictures of my entire Fall mantle, that I created for only $20, click here.  Happy creating!
I'd love to hear how yours turns out!


September 7, 2012

Cereal box to In Box

Ever wish you had a place to organize all that incoming mail, or bills, or papers from school...or basically anything that is cluttering up your table or counter?  Well, I was in need of a place to put new orders from my MK business, and my assistant (my sister) mentioned that I needed some sort of in box for her.  Alas, a craft is born!  This is the finished product:

 
This was so easy to make!  And it literally was FREE to make, just use what you have around the house.  If you don't have any paper you like, then it might cost you a little, but not much...maybe only a $1 or so.
 
Supplies:
Empty Cereal Box (or Cracker Box)
1 Sheet of 12 x 12 Scrapbook Paper
Ruler
Pencil/Marker
Scissors
Modge Podge
Craft Brush
 
 
How To:
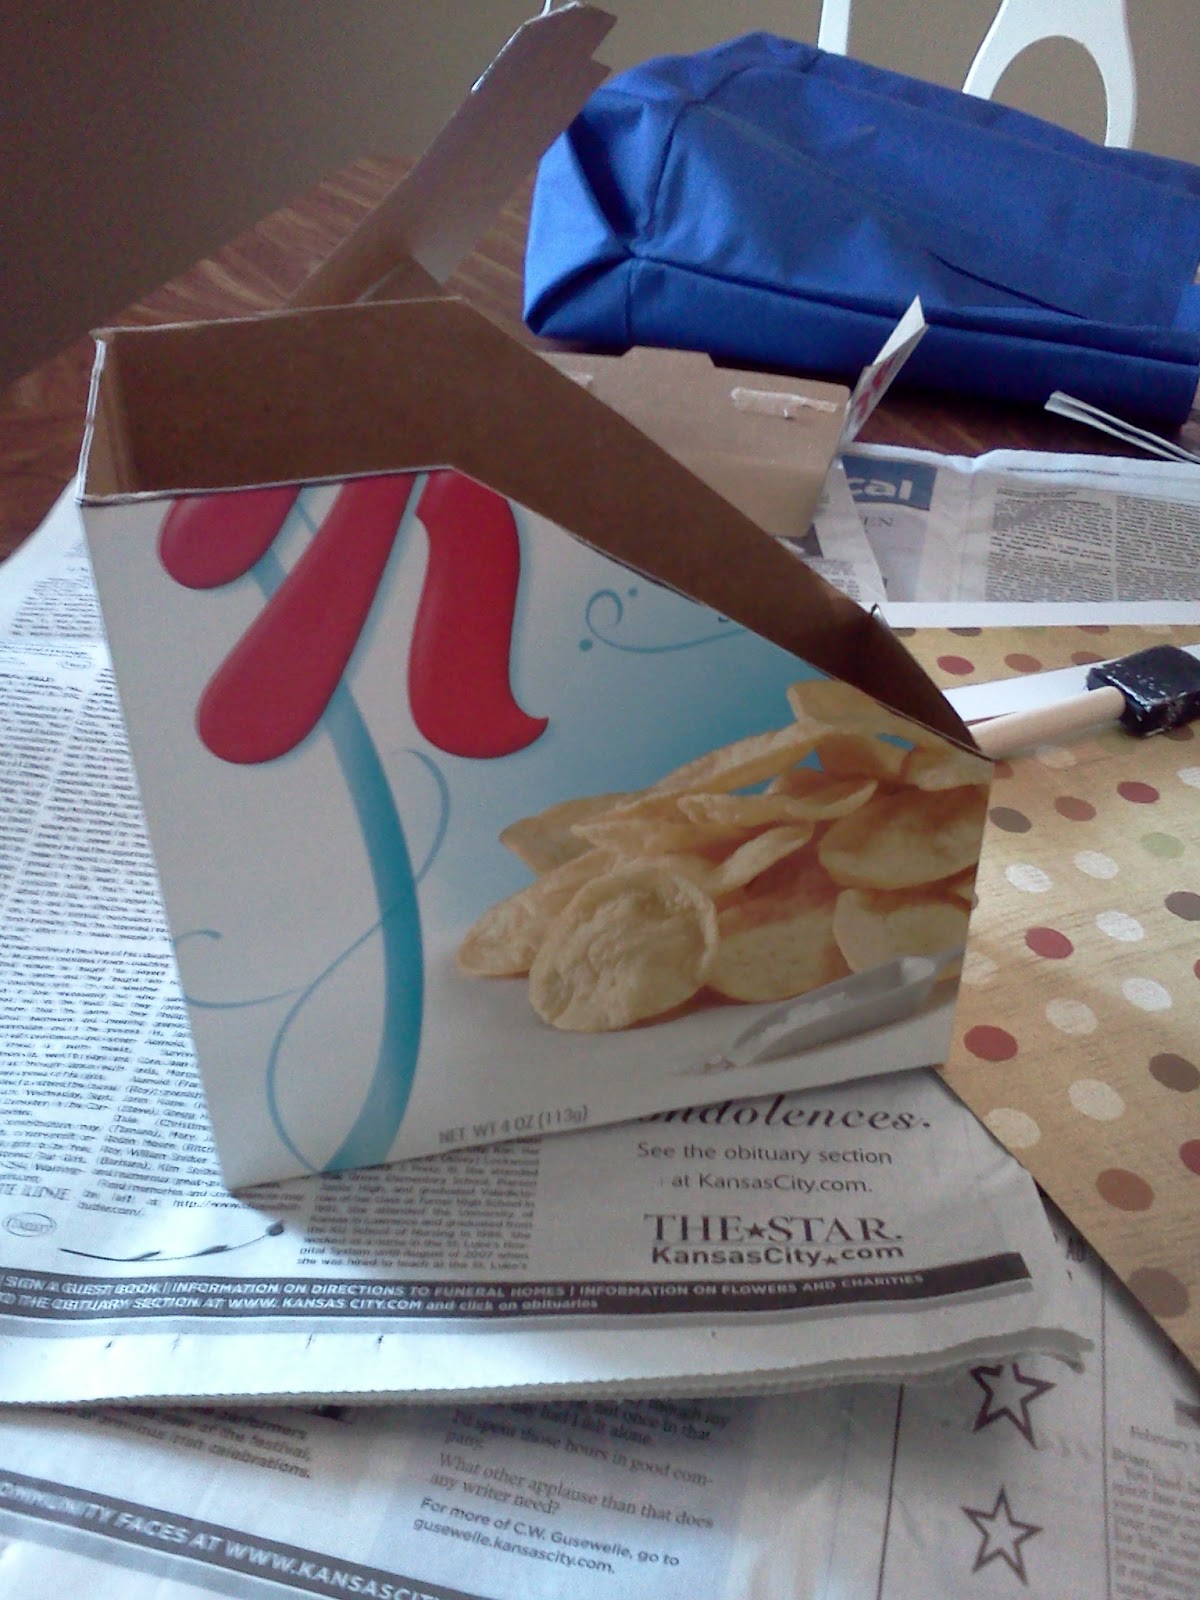
First, you will need to trace off your "in box" dimensions.
I used 2.5" from the left side and then 3" from the bottom.
 
 
Make sure you also draw straight lines on the sides of your box to mark where you will cut them as well.  Then draw a diagonal line from the 2 markings and start to cut your design.
 
 
Next step is to cut out your box following your marked lines.
 
 
Your project so far should now look like this:
 
 
Getting closer!  Now it's time to trace your template onto your scrapbook paper.  Use the edges of the paper so that you will be able to get all the necessary pieces on your 1 sheet of paper.  Make a template for the bottom of your box as well if you like...I did.
 
 
You will need a total of 5 templates if you are also papering the bottom of your box.  They will all fit if you place the two large sides on opposite ends of the paper from each other.
 
Now, cut out your templates and place them aside.  Next get out the modge podge and apply a light coat to 1 side.  Do one at a time so that you are not dealing with a sticky box. :)
 
 
One at a time, place your paper onto your box!  That's it! It should now look like this:
 
 
I added a "label" just in case I forgot what it was for on mine. :)


Pretty cool huh?!


Now to make one for an "out/to file box." :) 
Happy crafting!