Showing posts with label Winter. Show all posts

September 7, 2016

Boys can have Frozen Birthday Parties too! - G turns 9!

What is all of this about "FROZEN" is just for girls?!  Sooooo not true!  In fact, my little G is obsessed with Olaf and Elsa and Anna.  Frozen is his favorite movie! So of course we had to have a FROZEN themed Birthday party!  It works very well because his birthday is in January, so a winter themed party seemed like a no brainier!
 
This year, G asked for a pinata!  I've never done one of these before, but this was a GREAT idea!  No hitting the snowman, just pull a string and out pops the candy!!

Here are the invitations that I made for G's party!
 You can purchase one for your little Frozen fan at my Etsy shop!

The backdrop for this party took a little more time than I prepared for, but it was really cool!
 
I took 3 different colors of plastic tablecloths and taped them on top of each other, then I cut strips in them all the way except for maybe a foot from the top.  Then I tied 3 strips at a time together near where I stopped cutting. You can kinda see the knot at the top under the "snow."  After all that was done, then I cut "snow drifts" from white tissue paper and taped them on top of the tablecloths to hide most of the knots. 
 
The banner is made out of foam both blue and white (white glued on top) and then I took a Sharpie and wrote on each piece.

I decided to take advantage of some store bought decor this year and I was very happy with the way it turned out.  I usually opt for the DIY stuff, but this actually was pretty cute!
 
The centerpieces, tablecloths and napkins were all purchased from the store.  G punched some snowflakes out of some white paper to use as confetti to decorate.  The cups are the cheapo white cups from the store as well and I just used a black and orange sharpie to draw Olaf's face on them.

I decorated the banquet room with Christmas ornaments! I just hung white snowflakes from the ceiling and then made these bad boys out of construction paper to hang as well.
 
Again, not hard to make, just time consuming. You can find a tutorial of how to make these snowflakes here. I used a full size of construction paper for each of these pieces so mine were pretty large!

Now let's move onto the food!!
 
The backdrop here was MUCH simpler!  I just used the Dollar Tree plastic tablecloth again and then taped some foam snowflakes that I again got from the Dollar Tree.  The poster was one that G got from a coloring book or something like that and really wanted to use it as part of the decoration. Who am I to argue with the Birthday Boy?!

I'm really excited and proud of the cake, so let's start with that!
 
 This is not a great picture, but my ceiling was apparently not high enough for me to take a picture with the whole thing in the full frame!  Here's a close-up of just half of his body though...
 
This was SO EASY!!! It's just a bunch of cupcakes placed together and then iced as one Olaf!!  I piped the arms on and the buttons and then added the face and voila!! Instant cake! There was no cutting involved or anything! Just hand out the cupcakes to each kid and there you go!  I'm going to see if the kids will allow something like this every year! I loved it and there was NO STRESS!!

Let's go around the rest of the food table...
 
These sandwiches are made from Hawaiian rolls, lunchmeat and cheese! I made a Turkey version and a Ham version.  No mayo or anything, just dry.  They could add mayo or ketchup if they wanted, but most of the kids ate them as is.
 
I think you can figure out what went into this. :)
 
Yep, just pretzel sticks.
 
This is just blue raspberry jello.  The kids ate it up!
 
Seriously...just...water.
 
Okay, so this I had to do a little bit of work...these marshmallows were dipped in chocolate and then covered in blue sprinkles.  I used cake pop sticks to do that with. I really meant it when I said a LITTLE bit of work!
 
One of my favorite items on the menu...Swedish Meatballs! And yes, they have to be Swedish!!  It is a FROZEN party after all. :) Yum yum!!

So for the favors, we again, utilized the store bought items.
 
Everything that went inside them came from a Favor Pack that was Olaf Themed.  Even the bags came with it!  Totally easy peasy lemon squeezy! 

And there you have it!!! I hope you found some great ideas and are ready to plan your next Frozen party for either a girl or a boy! Happy Celebrating!

January 21, 2014

Winter (Post Christmas) Mantle

It is always challenging to decorate after Christmas.  I love all my Christmas decorations, but after a while, it just looks like I'm lazy and didn't want to take anything down.  Plus, we have a birthday boy right after Christmas and I would rather the birthday pictures not be filled with Jingle Bells and Christmas Trees.  So I searched the ever Holy Grail of all things crafty for ideas.  I realized that in the Winter, we still have snow, we still have cold and it is still appropriate to decorate with greenery, just not "Christmasy," so here is what I came up with...
It's my Monochromatic (sort of) Winter Mantle!
 I put up my silvery candle sticks that I love so much!  I tried to keep with a brown/white/natural and Green Theme with this.  you know, to stay away from the "Christmas" idea, but still be Winter.  The only problem was the red votive candles that were melted in my candle holders that I didn't take the time to get out.
In the center I put up my cream window pane and some of our pictures from our Family Photo Shoot this fall.  I LOVE the picture of the 2 boys!  There is an even better on with them smiling and looking down and all happy with each other, as if there are never any fights and they are best friends.  It is blown up to 20x24 and on canvas in our living room. :) That way I can always "remember when."
I made this rosette out of cardstock and then cut out our family Initial with my new Silhouette that I got for Christmas!  I punched a hole in the top, added some tulle and then taped it to the back of my window above my pictures!  I wanted to have our initial somehow, but the only one I had was bright blue...it did not match my "natural" color scheme...thus this was created!  I love it.  It's just enough femininity that I'm happy, but not too girly that my hubbs complains. :)
 This is the same Christmas garland that I had on my Christmas Mantle.  I just took off the silver snowflakes, and red ribbons. Again, I wanted a more muted color palette for winter.
 
I added some sprigs of pine that had been frosted with a muted silver and some pine cones to keep with the winter nature feel and then also placed some cream berries in the garland also.  I kept the lights on it because I just love the lights!  It makes my mantle look warm and inviting.  like there is a fire going all the time. :)
I also made these "snowballs" out of Styrofoam balls that I got from the Dollar Store. They were in a package of assorted sized and then I stuck a toothpick in them so that I could "attach" them to the garland.  It was very easy! I didn't even cover them or paint them or anything.  The Styrofoam itself looks like little glittering balls of snow already!

And there you have it! My Winter (Post Christmas) Mantle.  It's almost time to start thinking about Valentine's Day! I wonder what I will do for that?...


February 21, 2013

Snow Ice Cream!!

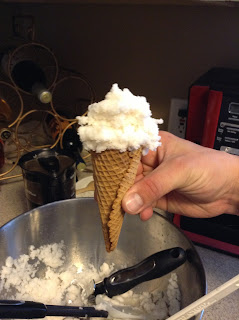
What a treat! We got around 12 inches of snow today and after playing a while, P suggested we make snow ice cream! I've never had it before so of course we did.  The boys had so much fun making it and eating it too.  It really tasted great! I was very surprised at the result!

Here's the recipe we used:
7-8 cups CLEAN snow ( nothing yellow)
5-6 Tbs sugar (we actually used 2-3 Tbs of Truvia blend)
2 tsp vanilla
1/4 cup milk
1/4 cup half and half

Mix together and serve immediately.


We also made an adult flavor by substituting brewed cold coffee instead of vanilla!  BIG HIT!  My sister said the coffee flavor tasted like Edie's slow churned from the store!!!!  I'm okay with that. :)