Showing posts with label Remodel. Show all posts

May 4, 2014

DIY - Shallow Cabinet for your Vitamins/Meds/Oils

Okay, I have a confession to make.  I forget to take my vitamins.  I forget to take my allergy pill.  In fact, it's probably a good thing that I don't have to take any life saving medication because I'd probably forget that too.  Don't get me wrong...I usually remember my children's items.  I make sure my husband has all the appropriate dosages...I just forget about me.  It's the total "out of sight, out of mind" situation.  I don't see my vitamins, so I don't take them.  And then I usually will remember them when I'm in the kitchen with all the appropriate cups of water, but no medications.  Then, when I start to walk to my master bath I see a toy on the floor, or pick up a laundry basket, or get into my room and figure out I must be there for some important reason, but have forgotten what that is...therefore again, no vitamins.

I started leaving them on the kitchen counter along with my other frequent meds (Advil...etc.), but my husband gently informed me that he didn't want them out because we have very curious children.  Children who do know how to move kitchen chairs and get onto counters where all of this beautiful poison (if taken in large doses) is waiting and looks like candy.  I know I'm not the only woman with this problem, BUT...I've come up with a solution!!  Why not build a medicine cabinet IN the kitchen?!

I know most of you probably have a shelf or two devoted to your meds in the kitchen.  I know because I've seen it!  My parents have one too, however, we just don't have enough cabinet space.  That's not entirely true...we have 1 empty shelf in our "pantry" cabinet that is literally near the ceiling.  Not helping with the forgetting thing...not to mention I'm a little vertically challenged.  Anyway...I searched Pinterest for a good tute on how to build one of these babies and couldn't really find one.  Plus, I really didn't want it to look like a dwarfed box on the side of my beautiful to-the-ceiling cabinets.  I wanted it to look as if it always belonged there...like whomever designed my cabinets thought about this ever-so-popular problem and built a cabinet for this purpose.  So off to Lowe's I went in hopes of figuring this out myself....

DISCLAIMER: I am NOT experienced in cabinet making or woodwork! In fact my first experience with power tools (besides a drill/screwdriver) was just a month ago when I renovated our Formal Rooms! Also, I've had several people ask for these instructions, so even though the project is not complete...I wanted to get these instructions out so we can all do it together!!

Here's my BEFORE:

 Beautiful glazed cabinets...to the ceiling I might add with PLENTY of room for a solution!! We moved into this house with these cabinets already done, so finding the appropriate paint color is going to be challenging. Anyway...I digress....

And my current AFTER....
 Like I said, it's a work in progress...but here's how I did it!

SUPPLIES:
You are going to need Pine (or Oak or any type of wood for that matter) in the dimensions you need them.  My cabinets are 42.5" tall and I have a 6" clearance from the end of my current kitchen cabinets and the door frame.  The cabinets are about 11 7/8" deep, so that gives me my length for my cabinets.  There is a current lip and some decorative trim around my cabinets so I decided it was easiest to leave that there and install my cabinets over both to give a little extra depth to my medicine cabinet.  I DID NOT MAKE A BACK TO MY CABINET.  I don't need one.  The side of my other cabinet works just great! Here are the dimensions of the wood that I got...All Pine...

CABINET -
4 - 1"x4"x4 ft pieces
2 - 1/2"x2"x4 ft pieces
1 - 1/2"x2"x2 ft piece
1 pkg of Hanging Hardware (Keyhole Fasteners)

DOOR - 
1 - 3/4"x10"x40.5" piece of MDF (I had the guy at Lowe's cut this to these dimensions for me for FREE)
1 - 8 ft piece of moulding to match the trim on my doors
3 Hinges

You will also need...
Saw (Power is faster and easier!!)
Nail Gun & Nails
Wood Glue
Power Drill/Screwdriver
3 - 2" Wood Screws
Measuring Tape
Something that is a right angle (I used a picture frame b/c we don't have an official right angle thingy)
Level
Spackle/Caulk
Sander/Sandpaper
Primer & Paint/Glaze

HOW TO:
First you need to saw your wood pieces into the correct dimensions you need. If you have a power saw, great! If not, this actually can be done with a common miter saw, but take my word for it...it is an exhausting process! It takes a lot of muscles and be prepared to be sore the next day....not that I'd know or anything. :)  I cut 2 of my 4"x4' pine strips to 42.5" to be the sides of my cabinet.  Then cut your "shelves."  Since I had to have a shelf to reach the ceiling I decided I wanted 6 total shelves so I needed 7 pieces (top included).  I cut the other 4"x4' strips to smaller 10" each pieces.  Then cut your 1/2" strips into the same dimensions.  2 long pieces, 2 small pieces.  You will want to miter the corners of these pieces since they will actually be seen in the front of your cabinet.

Then, once all your wood is cut, it's time to put it together!  Take 1 of your long 4" pieces and lay it down on your workspace.  Glue one side of your smaller pieces and place it in the spot you want your shelf, make sure it is a square 90 degree angle with your frame or fancy square tool thingy, then nail it in place (I recommend going bottom to top).  Repeat until all shelves are attached.
You will notice that my top and bottom are not flush to the edge of the long piece.  This is because your trim is going to overlap.  You will want to measure your trim on the edge of your long piece and then attach your bottom shelf to the "top edge" of your trim.  In my case I needed the top edge of my shelf to be at 2" from the bottom of my long piece.

You might also want to measure whatever it is that you will be storing on your shelves to make sure that your shelves are at the right height.  My shelves are in these dimensions -

_TOP SHELF_
8 ish" space_
___SHELF___
__6" space__
___SHELF___
__4" space__
___SHELF___
 _6" space__
___SHELF___
__4" space__
___SHELF___
__7" space__
_BOTTOM__

Then, take your second long piece, glue all the other sides of the shelves with the wood glue and attach.  Then make sure of course all your angles are square before you nail in place.
Next step is your trim part.  Make sure the edges are flush with one another with the trim overlapping to the inside of your cabinet.  Also, just like before, put wood glue on the wood first, then nail in place.
Be careful to make sure all corners are as close as you can get to flush!
Okay, here you can see that my bottom shelf didn't quite end up flush with my trim, but oh well...better on top then below. :)  Again, NOT a cabinet maker!

Here it is all put together!!

Okay, don't judge my shelves.  They might be square, but apparently they are not perfectly level...or maybe my table isn't level...not sure, but nothing is rolling around inside this cabinet at least.  Also, the photo is crooked...YEAH! That's it!! :) Again...NOT a cabinet maker.

Okay, now on to the door...
Make sure you cut these trim pieces when you cut your other wood, again, mitering the corners.  You won't want to go back.  Take really good measurements, since your door will most likely be smaller than your cabinet (mine is).  Take your piece of wood or MDF and glue your trim pieces and attach with a nail gun like before.
Again, try to get the corners really good...don't worry, if you have gaps. We will fill them soon.

Now to hang your cabinet! This was really tough for me and took me a really long time to figure out, so hopefully my thoughts will make your process shorter...

Get these hanger things:
 They come 2 to a pack. I bought 2 pkgs but only needed one.  You will want to install them onto the back of your cabinet.  Install them horizontally, where the big hole is on the SAME SIDE of your wall when your cabinet is placed in the final position (my wall is on the RIGHT so my big hole is on the RIGHT).  That means you will have the raised portion to the inside of your kitchen (again, my kitchen is on my LEFT, so my small hole is on the LEFT).  Sorry I didn't get any pictures of this...I was really trying to figure it all out and was so excited it worked (after several trials) I forgot to snap the pic.  Place one fastener on both sides of your BOTTOM shelf, just like hanging a curtain, one on the right, one on the left.

NOTE: If you have a lip and/or moulding on your cabinets you will want to move these fasteners about 2 inches inward on your bottom shelf.  This will allow your cabinet to eventually be flush to your current cabinet.

Then CAREFULLY measure the distance and hole locations of your fasteners and drill 2 wood screws into the side of your currently mounted cabinet so that they line up with the raised portion of your fastener.  DO NOT DRILL THE SCREW FLUSH TO THE CABINET!!  Leave about a quarter inch or so of the head out from your cabinet so that your fastener has something to grab.  Make sure you drill this into your bottom shelf so you don't have a random screw in your cabinet.  This should all line up since both bottom shelves are raised about an inch or 2 from the bottom of your "trim." This will also help to reinforce the weight of the cabinet and make it really strong.

Okay, now here is where you will need a friend/mom or husband to help you out.  You need to align
your big holes to the screw heads and then shove it (with force) to the wall to lock it in place.  If you are able to, put the fasteners on both the top and bottom of your cabinet, however, if you are like me with a ceiling and extra trim in the way, the bottom only will work just fine.

Next take your last wood screw and drill a hole into the side of your cabinet near the top (or middle if you have fasteners on both the top and bottom) and screw the side of the cabinet to the wall.  Since you are not storing dishes or anything really heavy in this cabinet, this is all the support you will need.  This works really well if you have a stud right there! I did and the screw is right into the stud.  Perfect!!

And this is what you are left with!!


See! Flush!! And I still have an inch or so for the door!! Looking good!!!

Next take your hinges and again, carefully measure where you want them and attach your door! I had a small hiccup with my hinges, so my door is not yet attached.  A door is not completely necessary, but I don't want to tempt the children with just a higher goal to reach for the "candy" and I also don't want to advertise to all our guests what EXACT medications we are using.

I did decide that I wanted my door to open away from the inside of my kitchen.  So my door hinges will go on the same side as my wall.  I'll install the matching hardware to the left side of my door and it will all match perfectly!

Now to make the cabinet look like it was always there.  You need to take your Spackle and fill in all your nail holes and gaps from your not-so-perfect mitered corners.
 Then you will want to sand all the rough edges and sand all the Spackle until it is completely smooth. Use the caulk to caulk the seam between your existing cabinet and your new cabinet.  You can also caulk the seam between your new cabinet and your wall.  Then Prime and Paint with your color of choice!

I'm still searching for the correct color of these cabinets, so I'm not exactly done with this project exactly yet...however I couldn't wait to use it so here it is right now in my kitchen!!


There's that crooked photo again. ;)  Well, I'm off to the paint store to find out what color my cabinets are!  I tried to convince my husband that we needed to remodel the kitchen NOW instead of later...then I wouldn't need to match this color, but could go ahead and paint them the perfect shade of slate grey, but that is a project we have not budgeted for yet (granite counters, new paint and decor for the walls, etc.) and he was very happy to veto that thought before it even finished coming out of my mouth. :)

I also need to go get some of the decorative moulding that is edging the top of my cabinets and run that along the top of my new cabinet so that it truly does match and look like it was always there.

Let me know if you plan on doing this in your kitchen...or what you will use your shallow cabinet for! I've also heard of storing Essential Oils in something like this!! :)  I do love my cabinet and am so excited that I did it all by myself!  No written plans or anything!! :) 

Oh, in case you were wondering, it only cost me $38 (including tax) with fancy (expensive invisible) hinges, Pine wood and 2 pkgs of fasteners!!  Again, if your cabinets are smaller, your cost will be cheaper by far!  You can't even buy a bathroom medicine cabinet for that cost!! I looked. :)

Happy Building!! Leave your comments below please!

April 11, 2014

Formal Room Reveal

Hello!

I am SUPER excited to FINALLY reveal my Formal Living and Dining Room project!!  Ever since we bought this house 2 years ago I have been dreaming and drooling over this day!  I knew instantly that this is what I wanted to do with the room and had to wait and save until I could finally do it.  I do have to say, now that the vision is complete I couldn't be more thrilled with how it turned out.  It is exactly what I had in my head and I can't wait for you to see all of it!!!

WARNING...I am a detail oriented person...if you are wanting to know step-by-step how to do this yourself, you are in luck!  If you just want to look at the pretty pictures, skip the words. :)

First things first...when we bought the house, this is what we moved into:

 Notice the Buy-me-Brown walls and the bare floors.  Our Formal Living Area is in the foreground and the Formal Dining is in the background.
 This is what our dining room looked like after I refinished some chairs, bought a rug and table and tried to make it work.
Sort of a picture of our Formal Living Area (a.k.a. my lesson studio)Aparantly I didn't take any true BEFORE pictures (I REALLY thought I did but can't find them), so I truly apologize for the "almost" pictures. 

And here...drum roll please...is the AFTER!!

 See how much more open the room looks?!  This is of course without anything on the walls.  And please forgive the several random curtains on the windows...that's a whole different story!

So here's the process...again, if you just want to see the pictures just keep on scrolling. :)

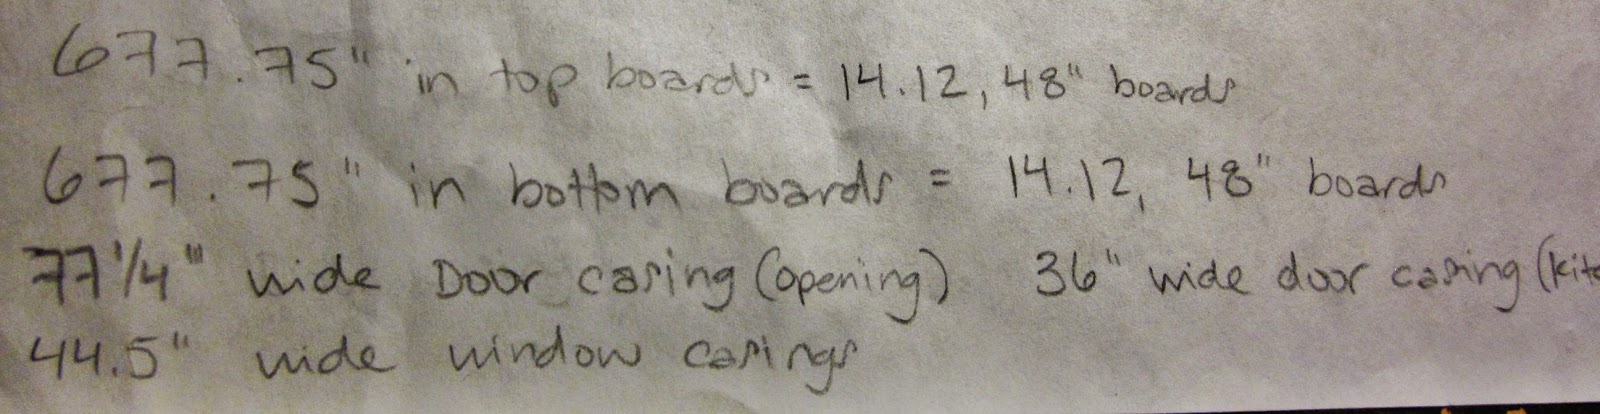
First comes the math...remember I've been wanting this for 2 years, so I've had some time to figure this out...but the math is the most important part.  Now, don't get me wrong, I'm not a fan of math at all...I'm a musician...all I have to know is how to count to 12, however, if you don't take the time to plan it out you will have funny looking walls and lots of random cutouts where your outlets go.  

I measured the length of each wall and what I wanted my finished product to look like.  I chose 3 inch vertical battens, 4 inch top battens and a 1 inch strip across the bottom (explained in a bit).  Plus I added a 1/2" x 1.5" "ledge" board on top and some cove moulding to finish it off.  
For the door/window casings I chose to keep my original casings and added a 6 inch header and a 1/2" x 1.5" board and some moulding (again, I will go through it better in a bit).
Remember when I said I measured each wall?  Well since I knew I wanted 3 inch battens I then had to figure out how many I needed...here's my room sketch...this took an entire afternoon to figure out.  Again, not a math person!
NOTE: In order to figure out the placement of the boards use this formula -
1) figure out how many vertical boards you want on the wall
2) multiply that times the size of the board (3 inches)
3) subtract that number from the total width of your wall in inches
**This gives you how much wall space is left! 

EXAMPLE:
6 boards = 18 inches
73 inches (wall width) - 18 inches = 55 inches (left over wall space)

4) then take this number and divide by the number of spaces between your boards (this number will always be 1 less than the number of boards)
**This gives you how many inches will be between your boards!

EXAMPLE:
55 inches/5 spaces = 11 inches between boards

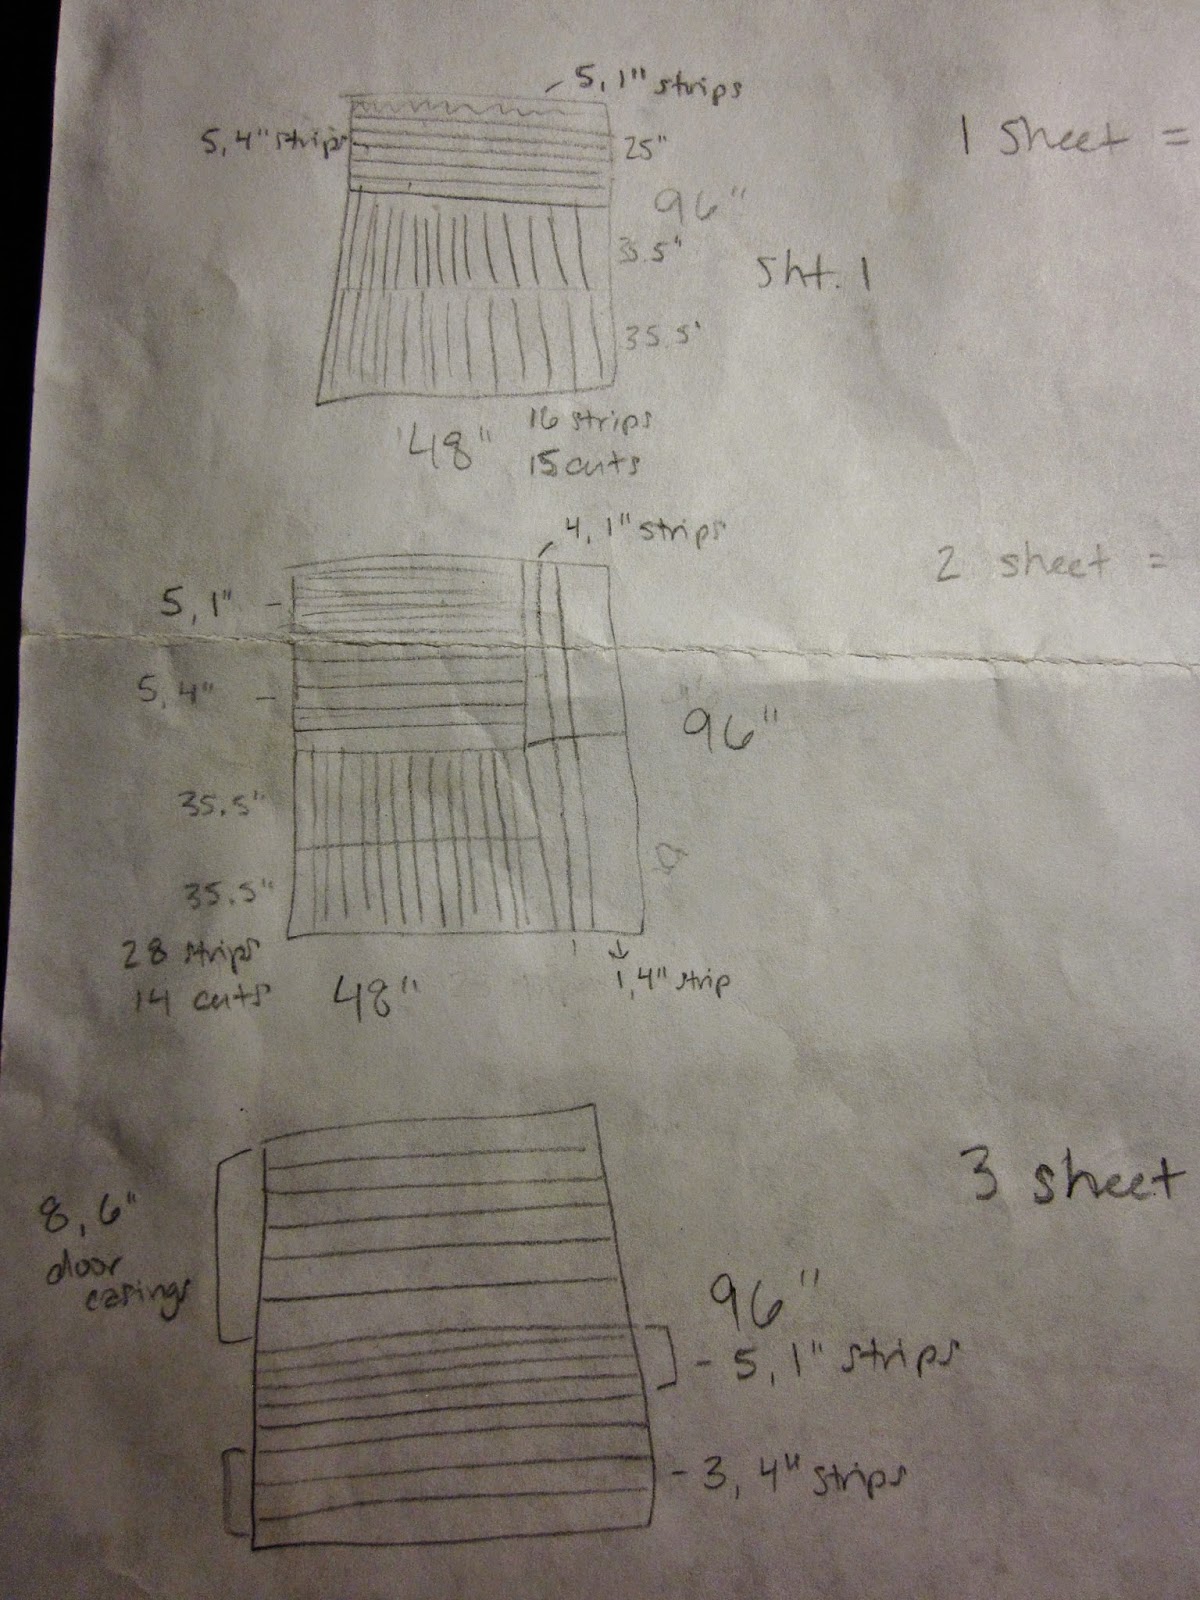
I even went as far as to figure out how many boards of which size I needed and how they would fit onto a sheet of MDF...all about the budget.  I wanted to know exactly how much this was going to cost.  After all, I've been saving little by little for 2 years.
 I know, I'm a little crazy.  But I wanted to know exactly how it was going to work out.  Anyway, after you have your main plan, head to the store.  I went to Lowes because it's close and that's where my gift cards were from (oh yes, I asked for gift cards in lieu of birthday presents).  To complete this project I needed the following supplies:

3 sheets of MDF
1/2" x 1.5" pre-primed MDF boards (8 foot pieces)
cove moulding (8 foot pieces)
bead moulding (8 foot pieces) for the door/window casings
small wooden moulding pieces that are flat on the back and curved on the top and bottom (8 foot pieces) for the door/window casings
Liquid Nails
Alex Plus Paintable Caulk
Dry Dex Spackle
Wall Primer
Paint in Satin finish for the top half of the room
Paint in Semi-Gloss finish for the wainscoting and casings

The guy at Lowes would not cut all the strips of MDF for me for free, but he would make rougher cuts so I could load it all into my car.  Again, a perfect use for my plan.  I just had him cut the sections already planned out and then borrowed this bad boy from a friend to finish the job!!
 
Check it out! My very first time using a Power Tool of this magnitude!!  I kept telling myself..."It's not worth loosing a finger!"

I have to admit, I was terrified the entire time, but soon, all that was left was this pile of amazingly cut, ready-to-install, strips of batten!

Now that everything was cut and ready to go I needed to get started painting!  First step is to paint the primer on the bottom half of the wall.  Don't worry about making it a perfect coat, just 1 coat of primer is all you need to prep your surface.  Trust me, this makes all the difference when you go to paint your installed wood.  I just painted up to the measurement that I wanted my wainscoting because the wall paint that I picked for my top half was the kind with the primer already in it!
Also, just in case you were wondering, don't ever use year-old paint and expect it to match the brand new paint that you just bought.  I figured, it's the same shade right? It will be fine!  I painted the entire dining room and cut in the entire living room with the year-old paint then painted the rest of the living room with the new paint.  My old paint had turned green.  I had to paint the entire 2 rooms AGAIN! 2 coats!! I was so frustrated...but hey, if that's the worst of my problems with a project this size I'm good! So, just a word to the wise...throw out the old paint. Just buy the new...you'll be glad you did.

Any-who...next paint the top portion of your wall with your color of choice.  I used Olympic Paint and Primer in ONE from Lowes. The color is called Secret Passage. I LOVE it! It's the perfect shade of grey...not too blue, not too brown, not too green.  Just beautifully grey! 
 It already looks bigger in here!  I love it!
There's a good "before" pic of the door/window casings!
 Since I have these gorgeous large picture windows I decided to bring the wainscoting up to just above the middle of the window. This way it is still under the half way point of the wall, but not too short that it would look weird.  Also, I needed to compensate for the size of my Dining Room chairs.  I didn't want the ledge hitting the back of the chair thus loosing precious inches in my room.  Also, this way I wouldn't have to cut around the light switches. 

Now for the fun part! Everything is ready to install!  I also borrowed a pneumatic finish nailer and air compressor for this project as I didn't want to spend energy or sanity on drilling in around 1000 nails by hand. I might be crazy, but no thank you.

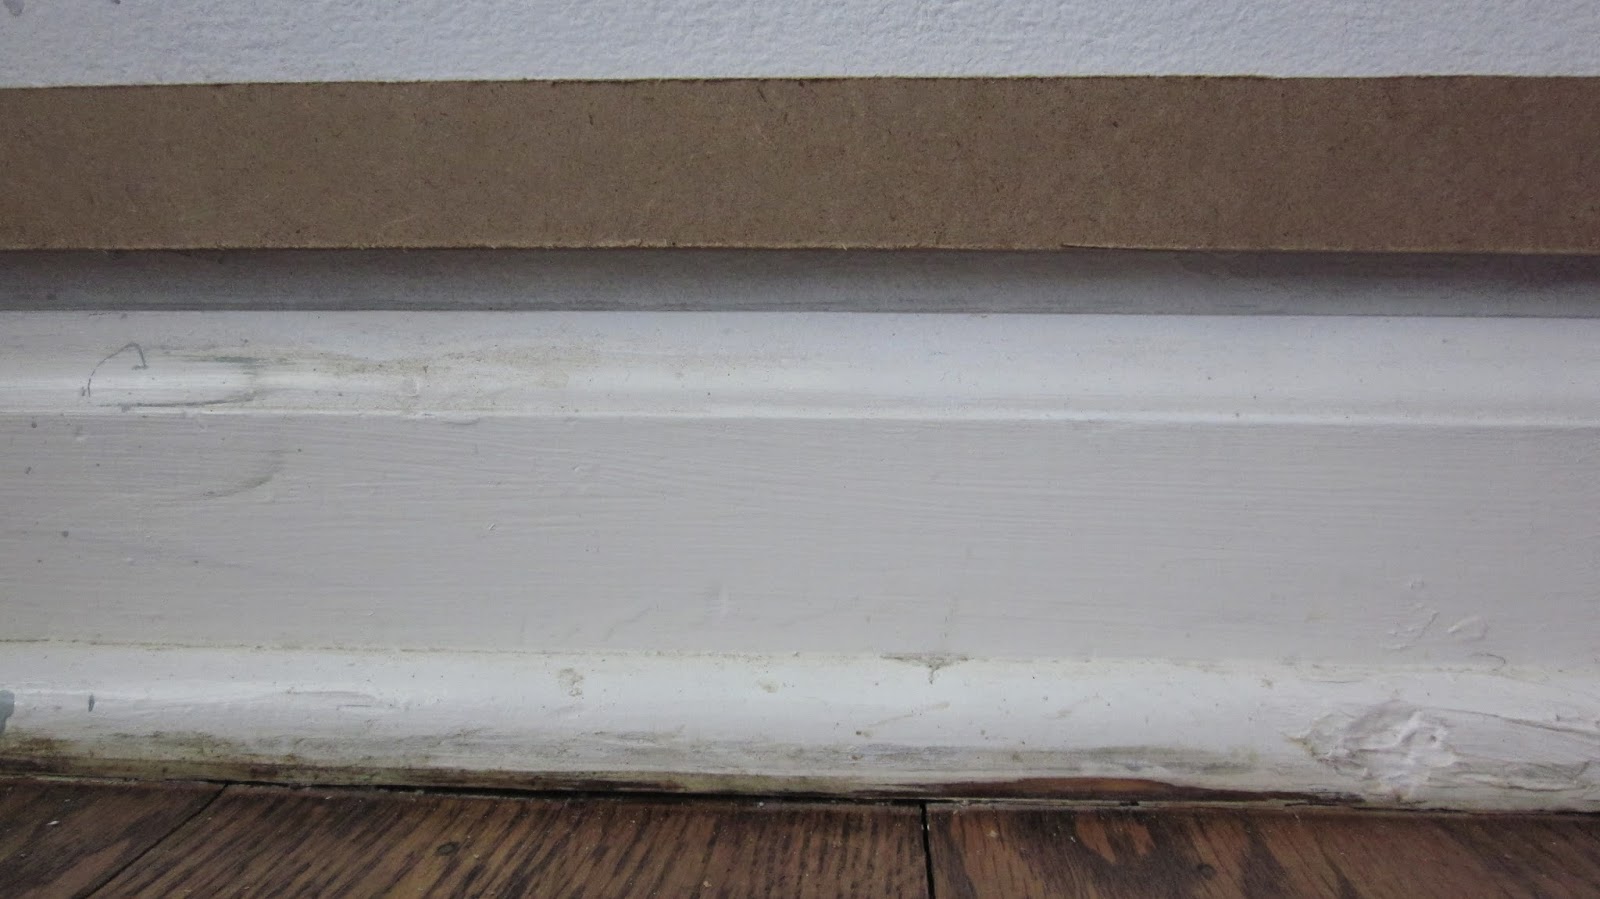
Remember those 1 inch boards I mentioned on the bottom?  Well I wasn't in the mood to remove my baseboards either, and I had read several blogs on how to keep my existing baseboards by butting the vertical battens up next to it and mitering the edge.  I personally didn't like the way that looked.  I just felt it needed to be a little more finished, but again, didn't feel like removing all the baseboards in my large room.  So, I figured that if I installed a 1 inch board about 1/2 inch above my baseboard I'd still get the look that I wanted and also get to keep my existing baseboards!  So if you want to go this route...install the bottom boards FIRST!!
Make sure you measure the height from your baseboards and LEVEL everything!  You'd be surprised what you think is level, is not!
 Here's a close-up of the existing baseboards and the wainscoting base.  Looking good!
The next step is to install the vertical 3 inch boards on top of your base.  Again, keep your plans and your measuring tape ready.  A good tip would be to mark on your wall where your boards are going to be to make sure the measurements all work out correctly. A few of mine were off just an inch or so and you do NOT want to pull it all out because the space between the last 2 boards is much bigger than the rest of your wall. TRUST ME.  
Also, another tip is to nail the boards in at an angle.  Dry wall is not a stud! The boards will move and separate from the wall after a while.  Another way to keep this from happening is to put a line of Liquid Nails on the back of each board before you nail them in.  This way it will stay for sure!!

After all your vertical boards are in place, go ahead and install your top 4 inch boards.  Then you can place your "ledge" on top of these boards to where it sticks out into the room 1.5 inches (short edge to the wall).  Then nail your cove moulding underneath the "ledge" to cover the seam of the two boards.
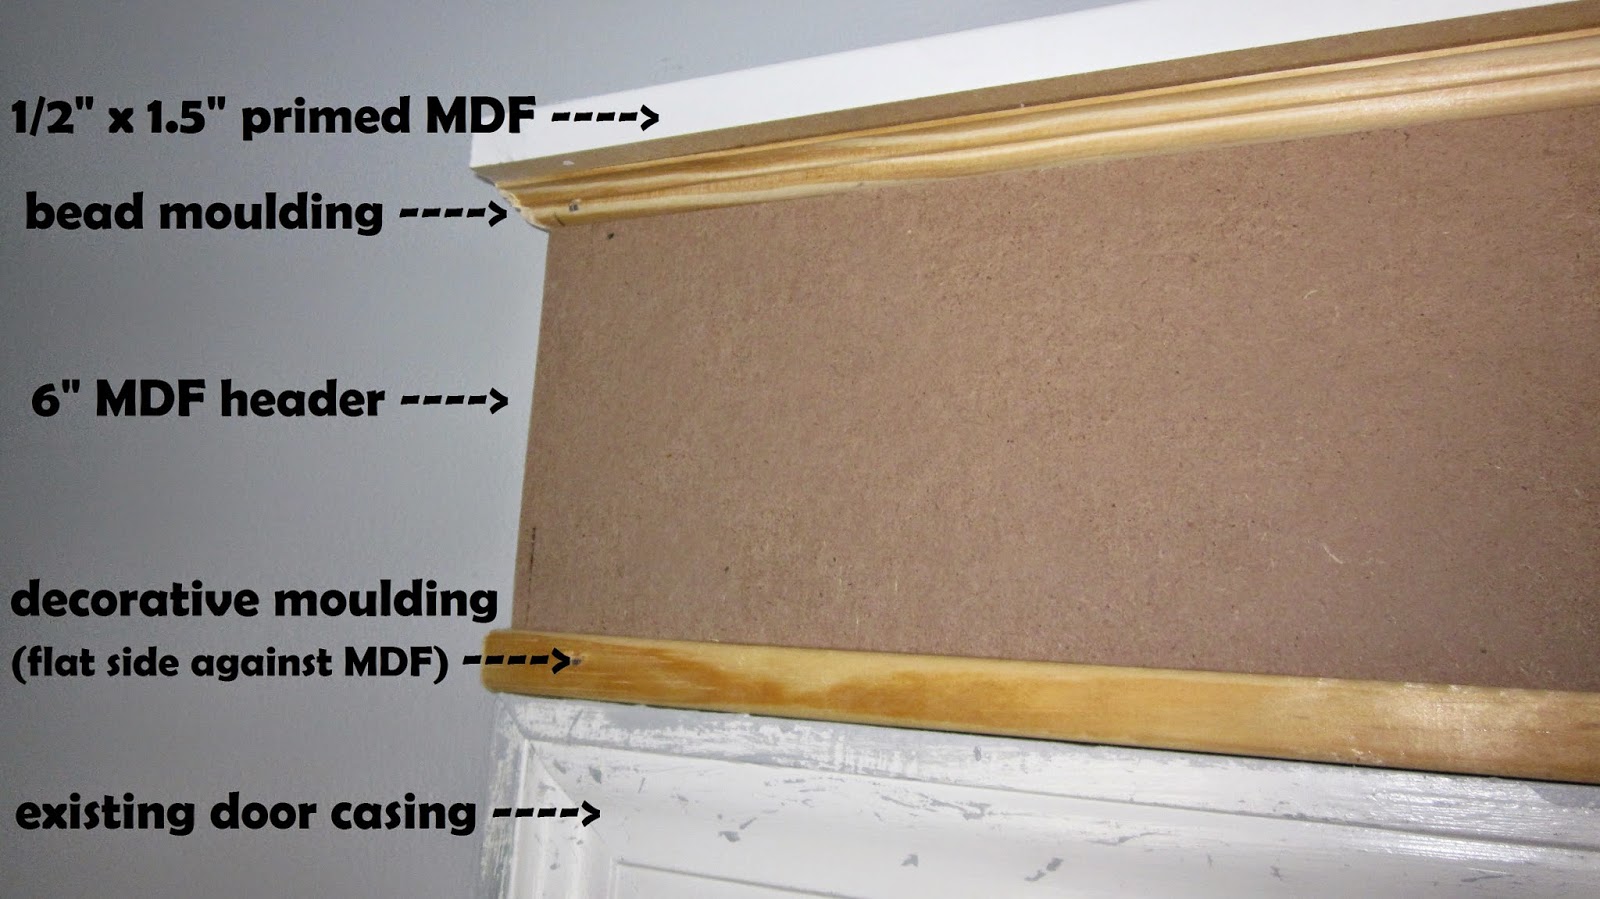
 For the Door/Window casings again, I didn't want to get rid of my existing casings so I just installed the headers on top of my current casings!  Here's a close up of the pieces:
 First install the 6" MDF directly on top of your existing casings.  Then install the "ledge".  After that you can install the moulding pieces to cover up the seams. 

 You won't have to miter the 6" MDF or the "ledge", but you will have to miter the small decorative mouldings.  I was ridiculous and mitered everything using a hand saw. I later found out that they do make automatic saws for this very occasion.  I just about lost a finger near cut 100 I think. Ridiculous! Also, while all the wood and such can be nailed in, the small itty-bitty pieces of the mitered edge are impossible to nail.  This is where the Liquid Nails comes to the rescue again!

Now that all the woodwork is installed you get to really get down and dirty! Here's where the really important work begins. Spackling, Sanding and Caulking. This took a couple of days for sure!  The spackle is for the nail holes and the seams of all the pieces.  Here are some pictures of the installed spackle.
This part can get REALLY tedious, but take your time, make sure it is all done right. It really does make a HUGE difference in your finished product.
 Then after all the spackle is in place, you need to sand it all down.  Make sure it is really smooth.  If it's not smooth, it will show up in the finished product.  This includes all the edges of your MDF too inside your squares on the wall. It may look smooth, but it really isn't unless you've sanded it.  Sand EVERYTHING! Again, really messy and really tedious, but REALLY worth it!
Next is caulking.  I know you are thinking..."but I just filled in all the spaces!" That may be true, but in the space between the ledge and the wall it's better to caulk.  The spaces between the existing window casings and the MDF, caulk.  and ESPECIALLY all the spaces where the MDF meets the wall...CAULK! You won't think you will need to because it's flush, but again, it really does make a difference.  It will create that seamless look like you just cut holes into your wall.  Here are some before caulk pictures to prove it to you.
 See all that space between the wall?!  Now here are the after caulking pictures.
 See the difference?!  Looks a ton better already!  NOTE: Make sure you get PAINTABLE Caulk.  Otherwise you will be very angry when your paint starts to peel. 

Okay! Ready to see some fruit from your labor?! Now it's time to start the painting process!! YAY!! The MDF will soak up the paint like a newborn baby drinking milk, so make sure you prime the wood first!  Get all those little crevices and edges.  Really lay it on thick.  The thinker your primer, the less top paint you will have to use.  Here is what it looks like with the primer on.
 It will still look a little splotchy, but that's okay...it's just primer and it is doing its job.  It is creating the barrier between your fresh wood and your top coat.  Remember, you only have to prime the MDF.  You primed your wall already before you started the installation!
You're almost done!! All that's left is the official paint!!  I used Olympic Interior Semi Gloss Self Priming Paint.  The color I chose was Snowy Mount.  I really like how crisp it looks next to my perfect grey!  

And, with no further adieu...here's the official finished product!!!!! :)


I spruced up my Entry Way too because this room was so beautiful I just couldn't stand it!  That post will be coming soon as well. :) Back to the pictures.

Here is the Dining Room in detail around the room...
See how the light just shines off the Semi Gloss Paint!!
On the ends of this little "partition" I put two 1 inch strips on the sides to make it look the same as the rest of the room.  It works for me.
Here's a closeup of the MDF base and the baseboard.  See how it works together well yet doesn't look out of place?  I think it turned out great!
Now the Living Room/Music Studio...

 Please don't mind the  mess on the table...it's a catchall for the moment. :)
And again...the crazy curtains.  When I put the original blue ones back up, they clashed with the tone of grey that I love...so I'm on the quest for new curtains now too.  I'm a little frustrated, but it will all work out in the end.  Stay tuned for the redecorating reveal coming soon. 
Want to see closeups of the window/door casings?  I thought so!  Here is the large entry way casing.
 Door to the kitchen.
 And my beautiful windows.


Well, there you have it! My fabulous new tailored Board and Batten Wainscoted Formal Living and Dining Room! I hope you enjoyed your tour and I hope you are inspired to create your own beautiful room.  

Stay tuned for the Redecorating Reveal that has to happen...I need to find something to put on these fabulous walls...and new curtains...and paint the pew...oh and the Entry Way...

Oh my!  If you give a Mom a Remodel! :) Until the next time! Happy Decorating!

Oh, just one more time:

BEFORE
and...

AFTER