This is the promised tutorial of how I refinished the garage sale chairs. It takes several days to finish each chair, but it is oh so worth it when it's done!! AND it's exactly what I want!! You can do it too! I'll tell you how - -
Supplies:
Wooden Chair
Spray Paint in your color choice (I like black)
Coarse Sandpaper or Electric Sander Tool thing
Fine Sandpaper or Sand block
Wood Stain
Q-Tips
Rag or old T-Shirt
How To:
First, start with a wooden chair. Any chair will do as long as you like it or need it refinished. Here's one of my finds from a garage sale. I paid $2 for it!
Notice this one is painted white? I don't want it white...I want it black. This one took a little longer in this next step, but the process is still the same. I will warn you...BEWARE of already painted chairs. Stained chairs are MUCH easier to refinish and don't take as long!!
Next, you will need to take your coarse sandpaper/block or electric sander and completely sand off the existing finish. You only need to make sure that the gloss is gone, you don't need to take it completely to the bare wood...unless the chair is already painted. (See note above)
Once the chair is "unfinished," you need to wipe it down. Use a damp rag or old T-shirt to do this. It is very important to get all the sand and dust off the chair. Otherwise, you will get a coarse look to your chair and it will take step one to get it looking better again.
Now that the chair is wiped off and bald...spray paint it. Make sure you get in all the nooks and crannies of the chair. The paint I used was Rustoleum Black Satin Enamel. It is important to get the Enamel kind because it will wear better. Since this is a chair we will use often, I wanted it to stand the test of time.
This particular spray paint needs 24 hours to dry completely, so watch some tv, dream about your new chair...basically whatever you can think of to pass the time. When the coat is done, your chair should look like so:
Mine is glossy because I didn't let it dry before taking the picture. The satin finish will dry to a smoother texture and look. Next step is to take your fine sandpaper/block and sand the chair down again. This will smooth out all the rough places from the previous sanding and again, help the chair to wear better. This time, you don't need to spend as much time sanding. Just a quick once over is fine.
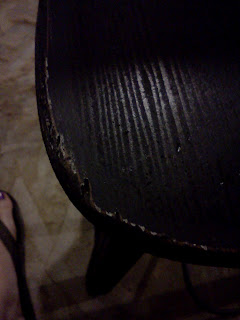
Now to "distress" your chair, spend more time around the edges and angles of your chair.
Be creative. The more you sand, the more "worn" your chair will look. I don't like a lot of distressing to it, but I do like some, so this doesn't take too long for me. Really think about where the chair would naturally wear down. Tops, seat, edges...etc. This is what it will look like when you're done.
Notice the "I've-had-this-chair-for-years-and-my-children-have-worn-it-out-antique look?"
Make sure to wipe the chair down again because you don't want fine black dust all over your clothes or the clothes of anyone who sits in the chair. Again, using a damp rag will work best.
Then take your Q-Tip and dip it in the stain of your choice. I used Minwax Provincial Stain. It's the same stain that we have on our floors, so I thought that would be a nice touch. Kind of matching, but no one would really notice. Your choice of stain WILL make a difference in the look of your chair, so choose what you like, not just what is available.
Run your dipped Q-Tip over all your distressed/exposed parts. Make sure to stain ALL your areas, otherwise, you will have a non uniform look. After you let the stain sit for a couple of minutes or so, make sure to wipe off the stain with a DRY rag. Again, not doing so could result in ruined clothing. If you want, you could use your rag and stain the whole chair again, but this is the quicker way.
Let the stain dry and then voila! You have a finished chair!
If you like, you could add another step to further protect your furniture from damage. Minwax makes a polyurethane coat in a spray as well. After you have completed the staining process, give a once over with this clear coat. It will just protect your chair from damage from daily use. I'm contemplating doing this with the chairs the kids will be using. It will also help with clean up from spills...etc as it will withstand soap and water cleaning well.
I hope yours will turn out well. It takes me about 3 days to finish a chair with all my little boys running around and wanting to eat and all. :) I do like the way they look around my table though!


No comments:
Post a Comment